Thank you for reading this post, don't forget to subscribe!
To get a visa, check the destination country’s rules, choose the right visa type, complete the required application, submit your documents, pay the fee, attend an interview if needed, and wait for a decision.
For people living in the United States, getting a visa is often part of planning a trip abroad, studying in another country, taking a job overseas, or joining family. The process depends on your passport, where you plan to go, why you want to travel, and how long you intend to stay. Some destinations let eligible U.S. travelers enter without a traditional visa, while others require an application before departure.
The first step is to check the official immigration or embassy website for your destination. Do not assume that a visa you received for one country will work for another. Also, remember that a U.S. visa and a visa issued by another country are different documents with different rules. This guide explains the usual steps, the documents you may need, the costs to plan for, and what to do if your application is delayed or refused.
Visa rules change, so use this article as a planning guide rather than a decision on your personal eligibility. The final requirements come from the government that will process your application. If you are applying to enter the United States, the U.S. Department of State and the relevant U.S. embassy or consulate provide the official instructions.
1. Understand What a Visa Is and Whether You Need One
A visa is official permission issued by a country that allows a traveler to seek entry for a stated purpose. Depending on the country, it may appear as a stamp, a label in a passport, a digital record, or an electronic approval linked to your passport. The type of permission you need depends on your nationality and your travel plans.
If you live in the United States, do not assume that being a U.S. resident means you can enter every country without a visa. Visa rules usually depend on your citizenship and passport. A U.S. citizen, a permanent resident who holds a passport from another country, and a foreign national temporarily living in the United States may face different requirements for the same trip.
Some countries offer visa-free entry for short visits to eligible travelers. Others require a traditional visa or an electronic travel authorization. These are not always the same thing. An electronic travel authorization may be available only to travelers who meet specific nationality and travel conditions, while a traditional visa may require a more detailed application and an appointment.
Before paying for tickets or accommodation, check the destination country’s official guidance. Confirm the permitted length of stay, the number of entries allowed, passport validity rules, and any transit requirements. If your trip includes several countries, check the rules for every destination, including countries where you only change planes.
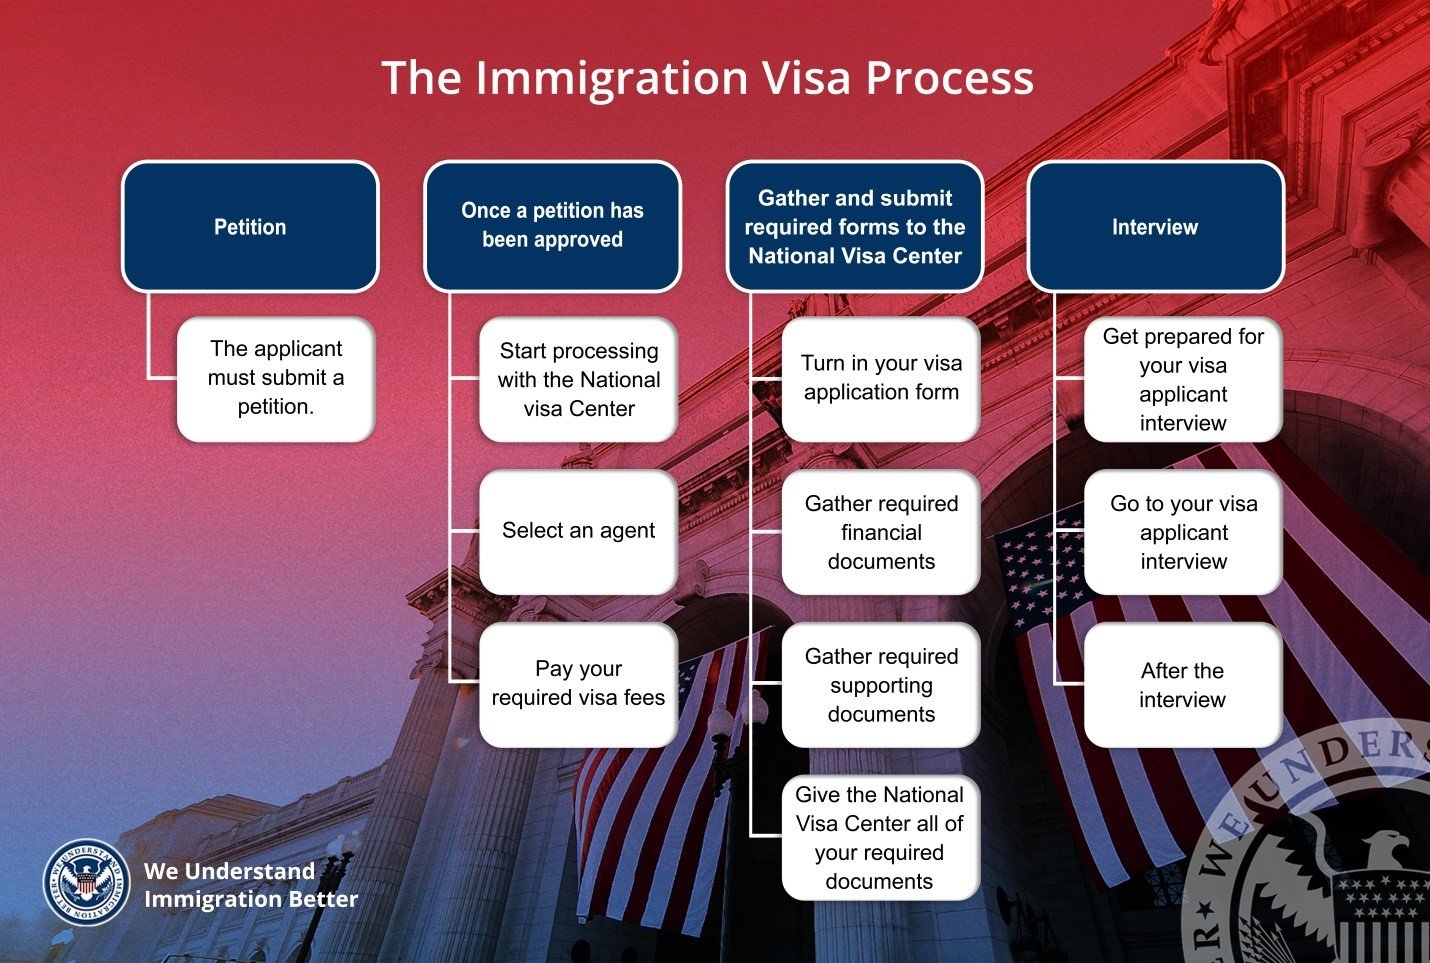
Source: schengeninsuranceinfo.com
Tourist or visitor visa
Usually intended for holidays, sightseeing, visiting friends, or other permitted short visits. Paid work is generally not allowed under a standard tourist visa.
Business visa
May cover activities such as meetings, conferences, or business discussions. It does not automatically authorize employment in the destination country.
Student visa
Used for approved study programs when the destination country’s rules require a student visa. You may need an admission letter and proof of financial support.
Work visa
Allows eligible people to work under specific conditions. Some countries require an employer to sponsor the applicant or obtain approval before the visa application.
Family or immigrant visa
May allow eligible family members to join relatives or move to another country permanently. These cases can involve sponsorship, relationship evidence, and additional checks.
Check the Difference Between a Visa and an Entry Permit
A visa often allows you to travel to a border and request entry, but it may not guarantee admission. Border officials can check your purpose, passport, and supporting documents. Some countries also use electronic permits or arrival procedures instead of traditional visa stickers. Follow the exact rules that apply to your passport and destination.
Before departure
Confirm that your visa or authorization has been approved and that its dates cover your planned arrival.
At the border
Be ready to explain your trip and show documents that support your stated purpose when asked.
2. Choose the Correct Visa for Your Trip
Choose your visa category before you complete a form or pay a fee. Governments assess applications under different rules, so selecting the wrong category can cause delays or refusal. Start by writing down why you are traveling, how long you will stay, where you will stay, and whether you plan to study, work, or visit family.
Read the official description of each visa category. Do not rely only on a travel blog, a social media post, or advice from someone who has a different passport. A person who visited a country for two weeks as a tourist may not have followed the same process as someone moving there for a job or a degree.
For example, imagine that a U.S. resident plans to attend a short business meeting in another country. A business visitor category may fit the planned activities, but a work visa could be necessary if the person will perform paid duties. The correct answer depends on the destination’s laws and the exact activities planned.
If you are applying for a U.S. visa, the same principle applies. A visitor visa is not a general permit for every activity. Temporary work, full-time study, and permanent immigration often follow different processes. Check the official category rules before submitting an application.
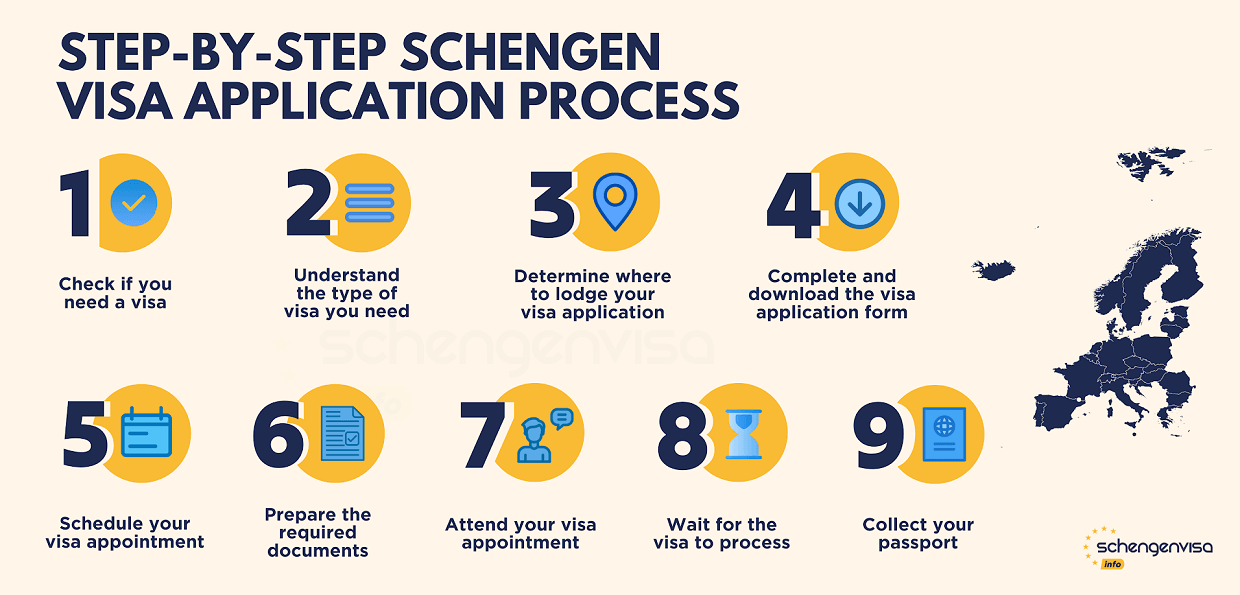
Source: en.usvisaservice.de
Match the visa to your main purpose
Describe your actual plans and select the category that permits those activities.
Check sponsorship rules
Find out whether you need a school, employer, family member, or other sponsor before you apply.
Review entry conditions
Check whether the visa permits one entry or several entries and whether it limits the length of each stay.
Check transit rules
A connection through another country may require separate permission, even if you do not plan to leave the airport.
Know the Difference Between Visa Validity and Length of Stay
Visa validity is the period during which a visa may be used to seek entry, while the permitted stay is the time you may remain after admission. These dates can differ. A visa valid for several years does not necessarily let you stay in the country for that entire period. Check the entry stamp, electronic record, or official conditions that set your permitted stay.
Check the dates
Make sure your planned arrival falls within the allowed period.
Check the stay limit
Follow the permitted duration for each visit, not just the expiry date printed on the visa.
3. Gather the Documents Needed for a Visa Application
Prepare your documents before you begin the application. The exact list varies by destination, visa category, nationality, and personal circumstances. A short tourist visit may require fewer documents than a student visa or an application based on family sponsorship.
A passport is often the key document. Check that it is valid for the period required by the destination country and that it has enough blank pages if needed. Some countries require several months of validity beyond the planned departure date. Others apply different rules, so do not rely on a single global rule.
You may also need a digital or printed photograph that meets official size, background, and image-quality rules. If the form asks for a photo upload, check the technical requirements before submitting it. A photo that looks fine on your phone may still fail the government’s specifications.
Supporting documents should help confirm your purpose of travel and ability to meet the visa conditions. Depending on your case, these may include bank statements, employment letters, school admission records, hotel details, a travel plan, an invitation letter, or evidence of family relationships. Provide only documents that are relevant or requested, and make sure they are genuine and consistent.
Source: studyvisa.in
Valid passport
Check its expiry date, condition, and any blank-page requirements.
Completed application
Use the official government portal or the application channel named by the embassy.
Photograph
Follow the required dimensions, file format, background, and recency rules.
Proof of funds
Provide the financial records requested to show how the trip or stay will be paid for.
Travel purpose evidence
Use relevant bookings, an invitation, an admission letter, or employer documents when the category calls for them.
Evidence of ties or commitments
Where relevant, records of work, study, family, or residence may help explain your circumstances and plans.
Translations
Check whether documents in another language need certified translations or a particular format.
How Much Money Do You Need to Show?
There is no single bank balance that guarantees a visa. Some countries set specific financial rules for particular categories, while others assess whether your resources are reasonable for the trip and your circumstances. Your costs may include lodging, meals, transport, tuition, insurance, and other expenses.
Use genuine financial records and explain the source of funds if the rules or application require it. A sudden deposit that has no clear explanation may raise questions. Do not borrow money temporarily or submit altered statements simply to make an account look stronger.
Estimate the full cost
Add the expected costs for the whole permitted stay and check the official financial rules.
Keep records consistent
Make sure the application, bank records, employment details, and travel plan do not conflict.
Organize Your Documents Before Submission
Create a checklist based on the embassy’s current instructions. Save copies of forms, receipts, appointment confirmations, and documents you submit. If the government requests originals, bring them as instructed. Keep private documents secure, and do not send passport details or bank statements to an unverified agent.
Use a checklist
Mark each requirement only after you have checked that the document is complete and readable.
Keep copies
Save a secure copy of the application and its supporting records for your own reference.
4. Complete the Application Form and Pay the Required Fee
Once you know the correct category and have your documents ready, complete the official application form. Some governments use an online form, while others require a paper form or a combination of online and in-person steps. Use the official website linked by the destination country’s embassy or immigration authority.
Enter your name exactly as it appears on your passport unless the form gives different instructions. Check passport numbers, dates, addresses, travel history, employment details, and the purpose of your visit. If a question does not apply to you, follow the form’s directions rather than guessing what the answer should be.
Review the entire form before submitting it. A small error can lead to a request for correction, a new appointment, or a delay. If you discover a mistake after submission, read the official correction instructions. Do not create duplicate applications unless the authority tells you to do so.
Visa fees depend on the country and category. There may be separate charges for application processing, biometric collection, service centers, courier delivery, or issuance. Some fees are nonrefundable even when an application is refused. Check the official fee page and save the payment receipt.
A visa agent may help with administrative tasks, but paying an agent does not guarantee approval. In many cases, you remain responsible for the truth and accuracy of the information submitted in your name. Never sign a blank form or allow someone to invent answers on your behalf.
Source: btw-crm-production.s3.amazonaws.com
Use the official application portal
Confirm the web address through a government or embassy website before entering personal details.
Answer truthfully
Give complete and accurate information, including any details the form specifically requests about past travel or refusals.
Pay through an approved method
Follow the official instructions for online payments, bank deposits, or approved service centers.
Save your confirmation
Keep the application number, barcode page if applicable, payment receipt, and submission confirmation.
Example: Applying for a U.S. Visitor Visa
A foreign national who needs a temporary visitor visa for tourism or certain business visits to the United States will generally start by checking the visitor visa instructions on the U.S. Department of State website. Many applicants must complete Form DS-160 online, upload a suitable photo, pay the required application fee, and arrange an interview according to the relevant embassy or consulate’s instructions.
Applicants should keep the DS-160 confirmation page and bring the required documents to the interview. The U.S. Department of State lists a standard application fee for many visitor visa applications, but fees and additional charges should be checked on the official page before payment. The process, appointment availability, and any interview waiver depend on the applicable rules and local instructions.
First
Confirm that a visitor visa is appropriate for the planned activities.
Next
Complete Form DS-160 accurately and save the confirmation page.
Then
Follow the local embassy or consulate’s directions for fee payment and interview scheduling.
5. Book an Appointment and Prepare for Your Visa Interview
Some visa applications require an appointment for an interview, biometric collection, or document submission. Others may allow eligible applicants to complete some steps online or qualify for an interview waiver. The rules depend on the destination, visa type, age, application history, and local procedures.
Check the official appointment system after submitting the form, if the instructions require it. Do not assume that the embassy will automatically schedule an interview for you. In some systems, you must pay the fee first, create an appointment profile, and choose an available date.
Appointment wait times can change. They may be longer during busy travel seasons or at locations with high demand. Start early, especially if you need a visa for a school term, a work start date, or a planned family visit. Avoid buying nonrefundable travel arrangements before you understand the visa timeline and risk.
If an interview is required, prepare to explain your plans in simple, direct terms. The officer may ask why you are traveling, how long you will stay, who will pay, where you will stay, and what you plan to do. The questions vary, and no list can predict every interview.
Bring the documents required by the official instructions. Your answers should match your application and supporting records. You do not need to memorize a speech or make your circumstances sound better than they are. Clear, honest answers are more useful than rehearsed claims that do not match the facts.
Source: wakawakadoctor.com
Review the appointment notice
Check the date, time, location, entry rules, and list of documents to bring.
Prepare your key details
Know your travel dates, reason for travel, funding plan, accommodation details, and relevant background.
Arrive as instructed
Allow enough time for security checks and follow the embassy or service center’s rules about bags and electronic devices.
Ask about special needs in advance
Contact the official office if you need an interpreter, accessibility support, or guidance about bringing a child.
What If You Cannot Find an Appointment?
Check the official appointment portal for newly released dates and follow the embassy’s published instructions. Some posts update availability as capacity changes. If you have a genuine urgent situation, check whether an expedited appointment process exists and what proof is required. An urgent request is not a guarantee of an earlier appointment or visa approval.
Check for official updates
Use the relevant embassy or consulate website rather than relying on rumors or paid appointment sellers.
Keep your application details
Save your confirmation number and follow the rules for changing or rescheduling an appointment.
6. Wait for the Decision and Check Your Visa Carefully
After you submit your application and complete any required appointment, the government will review your case. Processing may take a short time or several weeks or longer. The timeline depends on the country, visa category, application volume, background checks, missing documents, and other case-specific factors.
An appointment date is not the same as a decision date. Some applicants receive a decision at the interview, while others must wait for further review. An authority may ask for extra documents or additional information. Respond by the stated deadline and use the method given in the official notice.
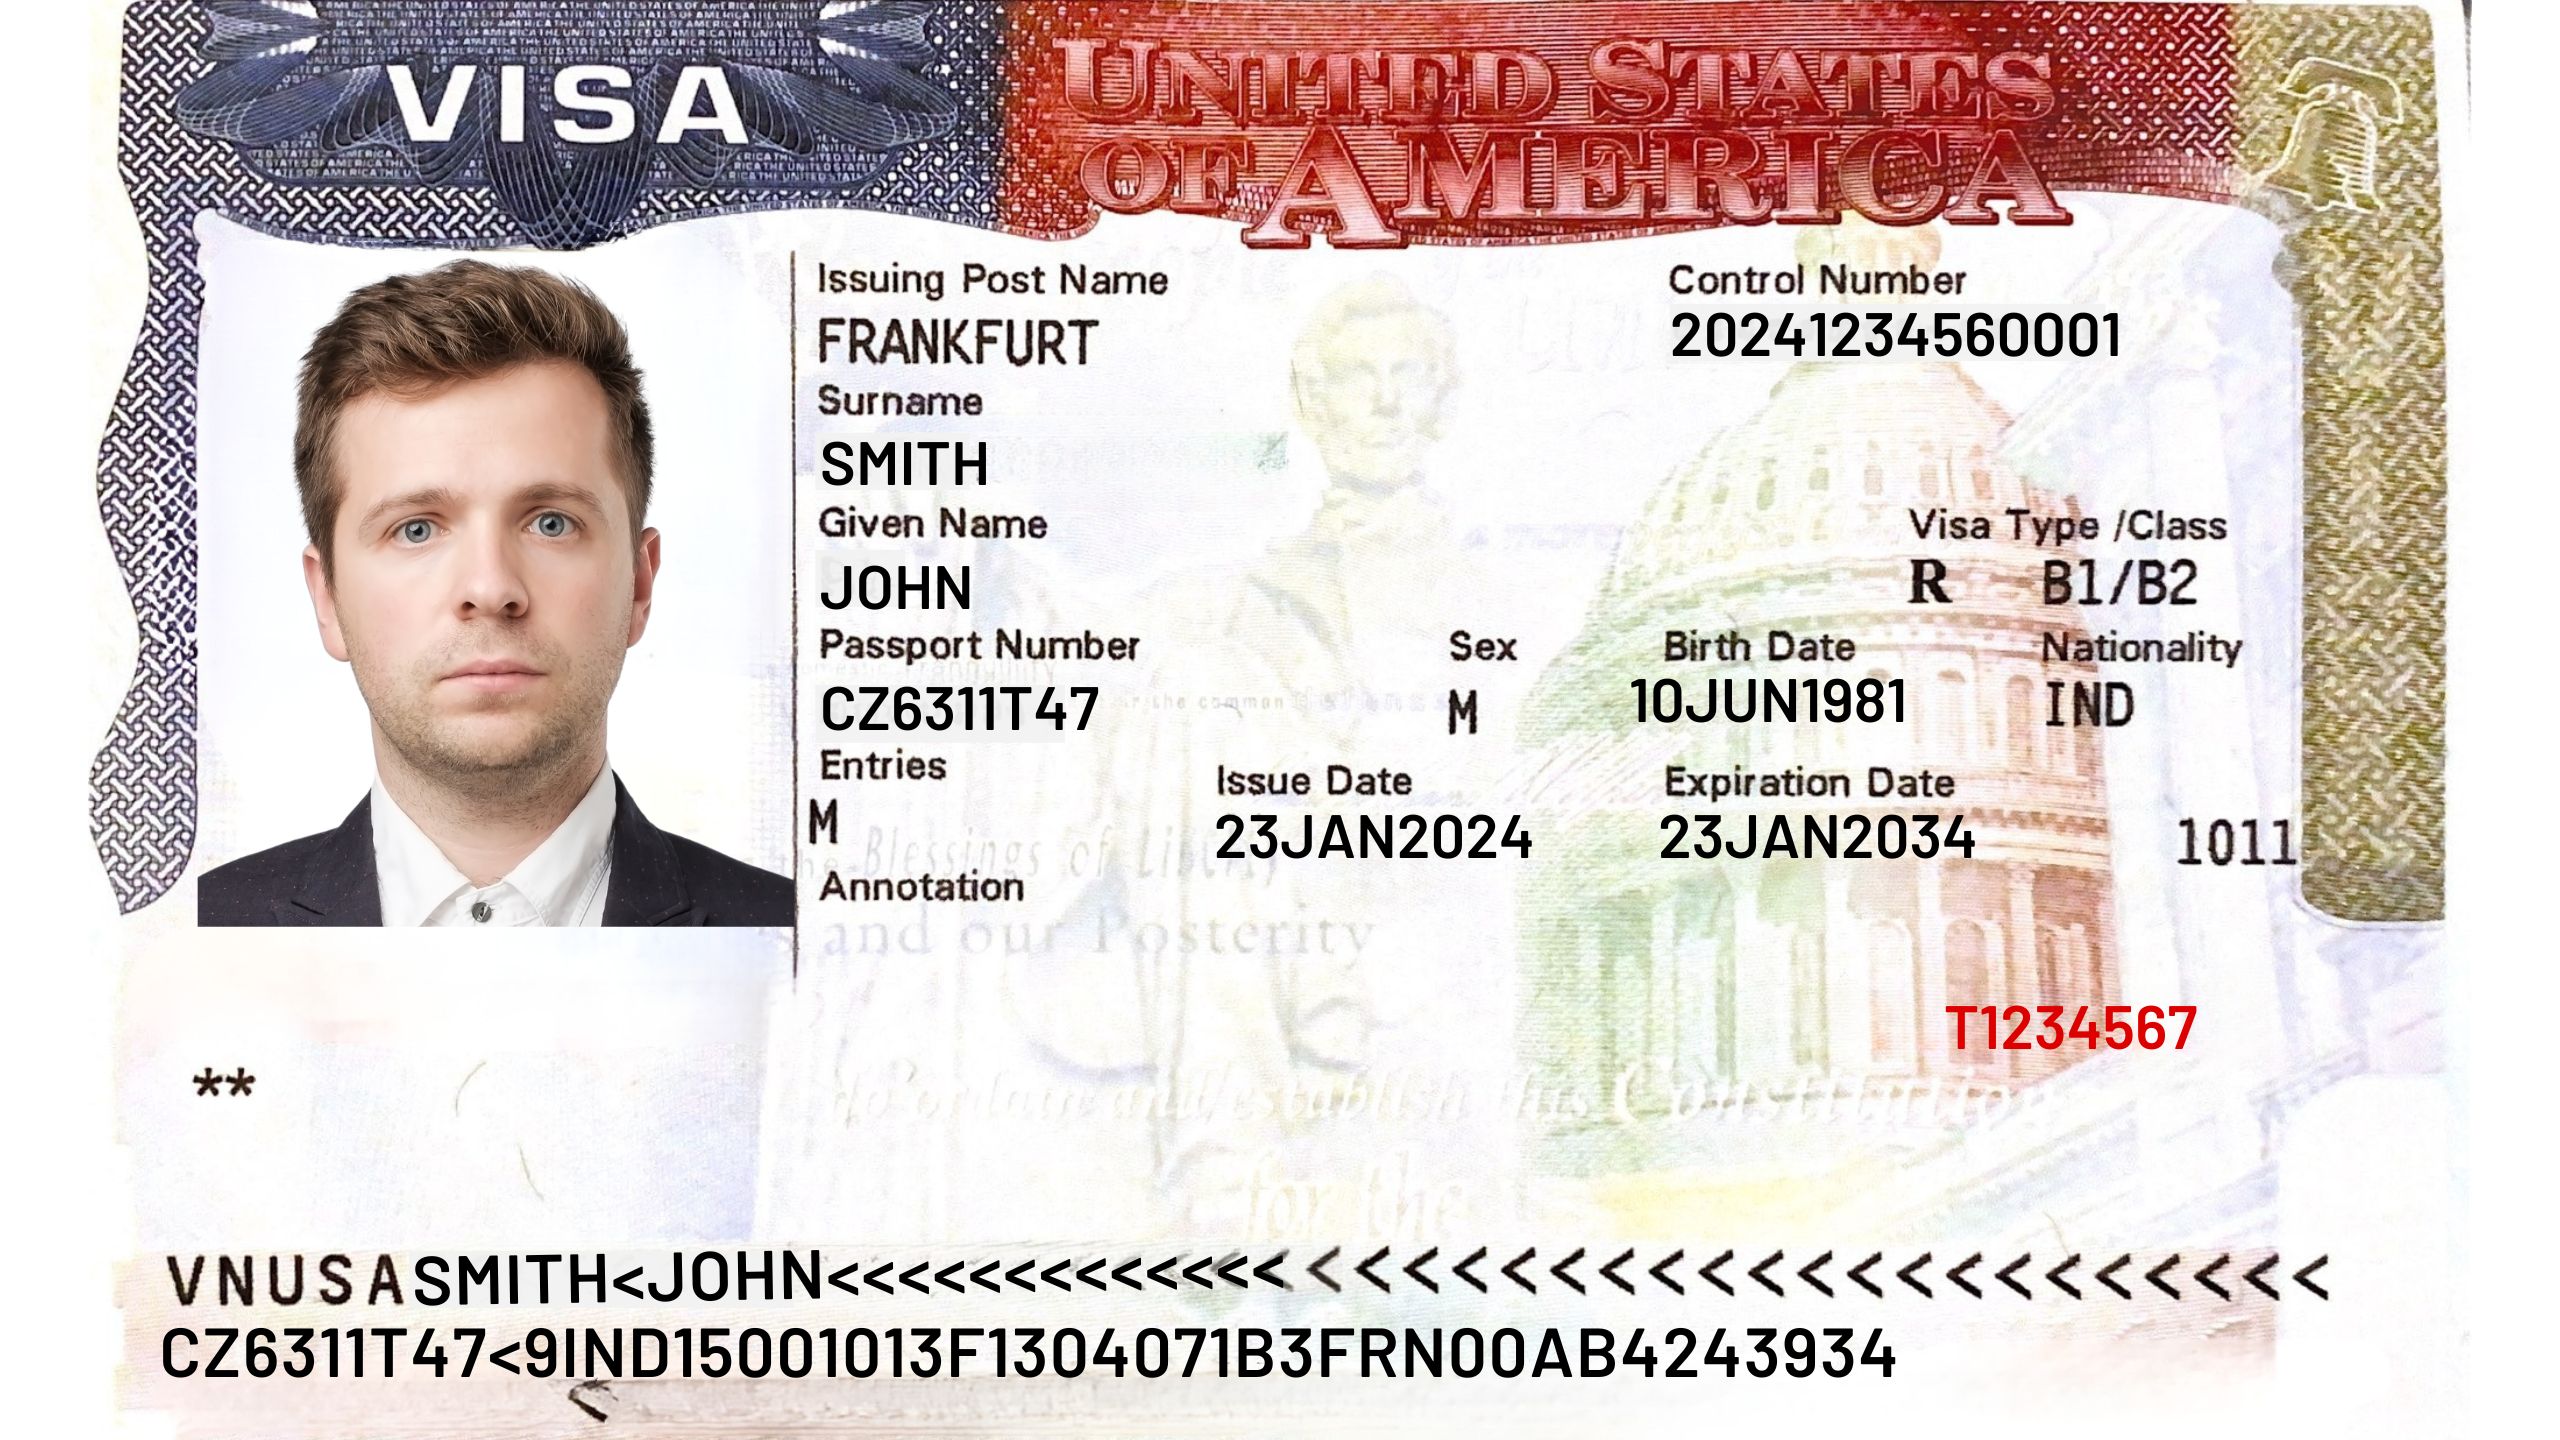
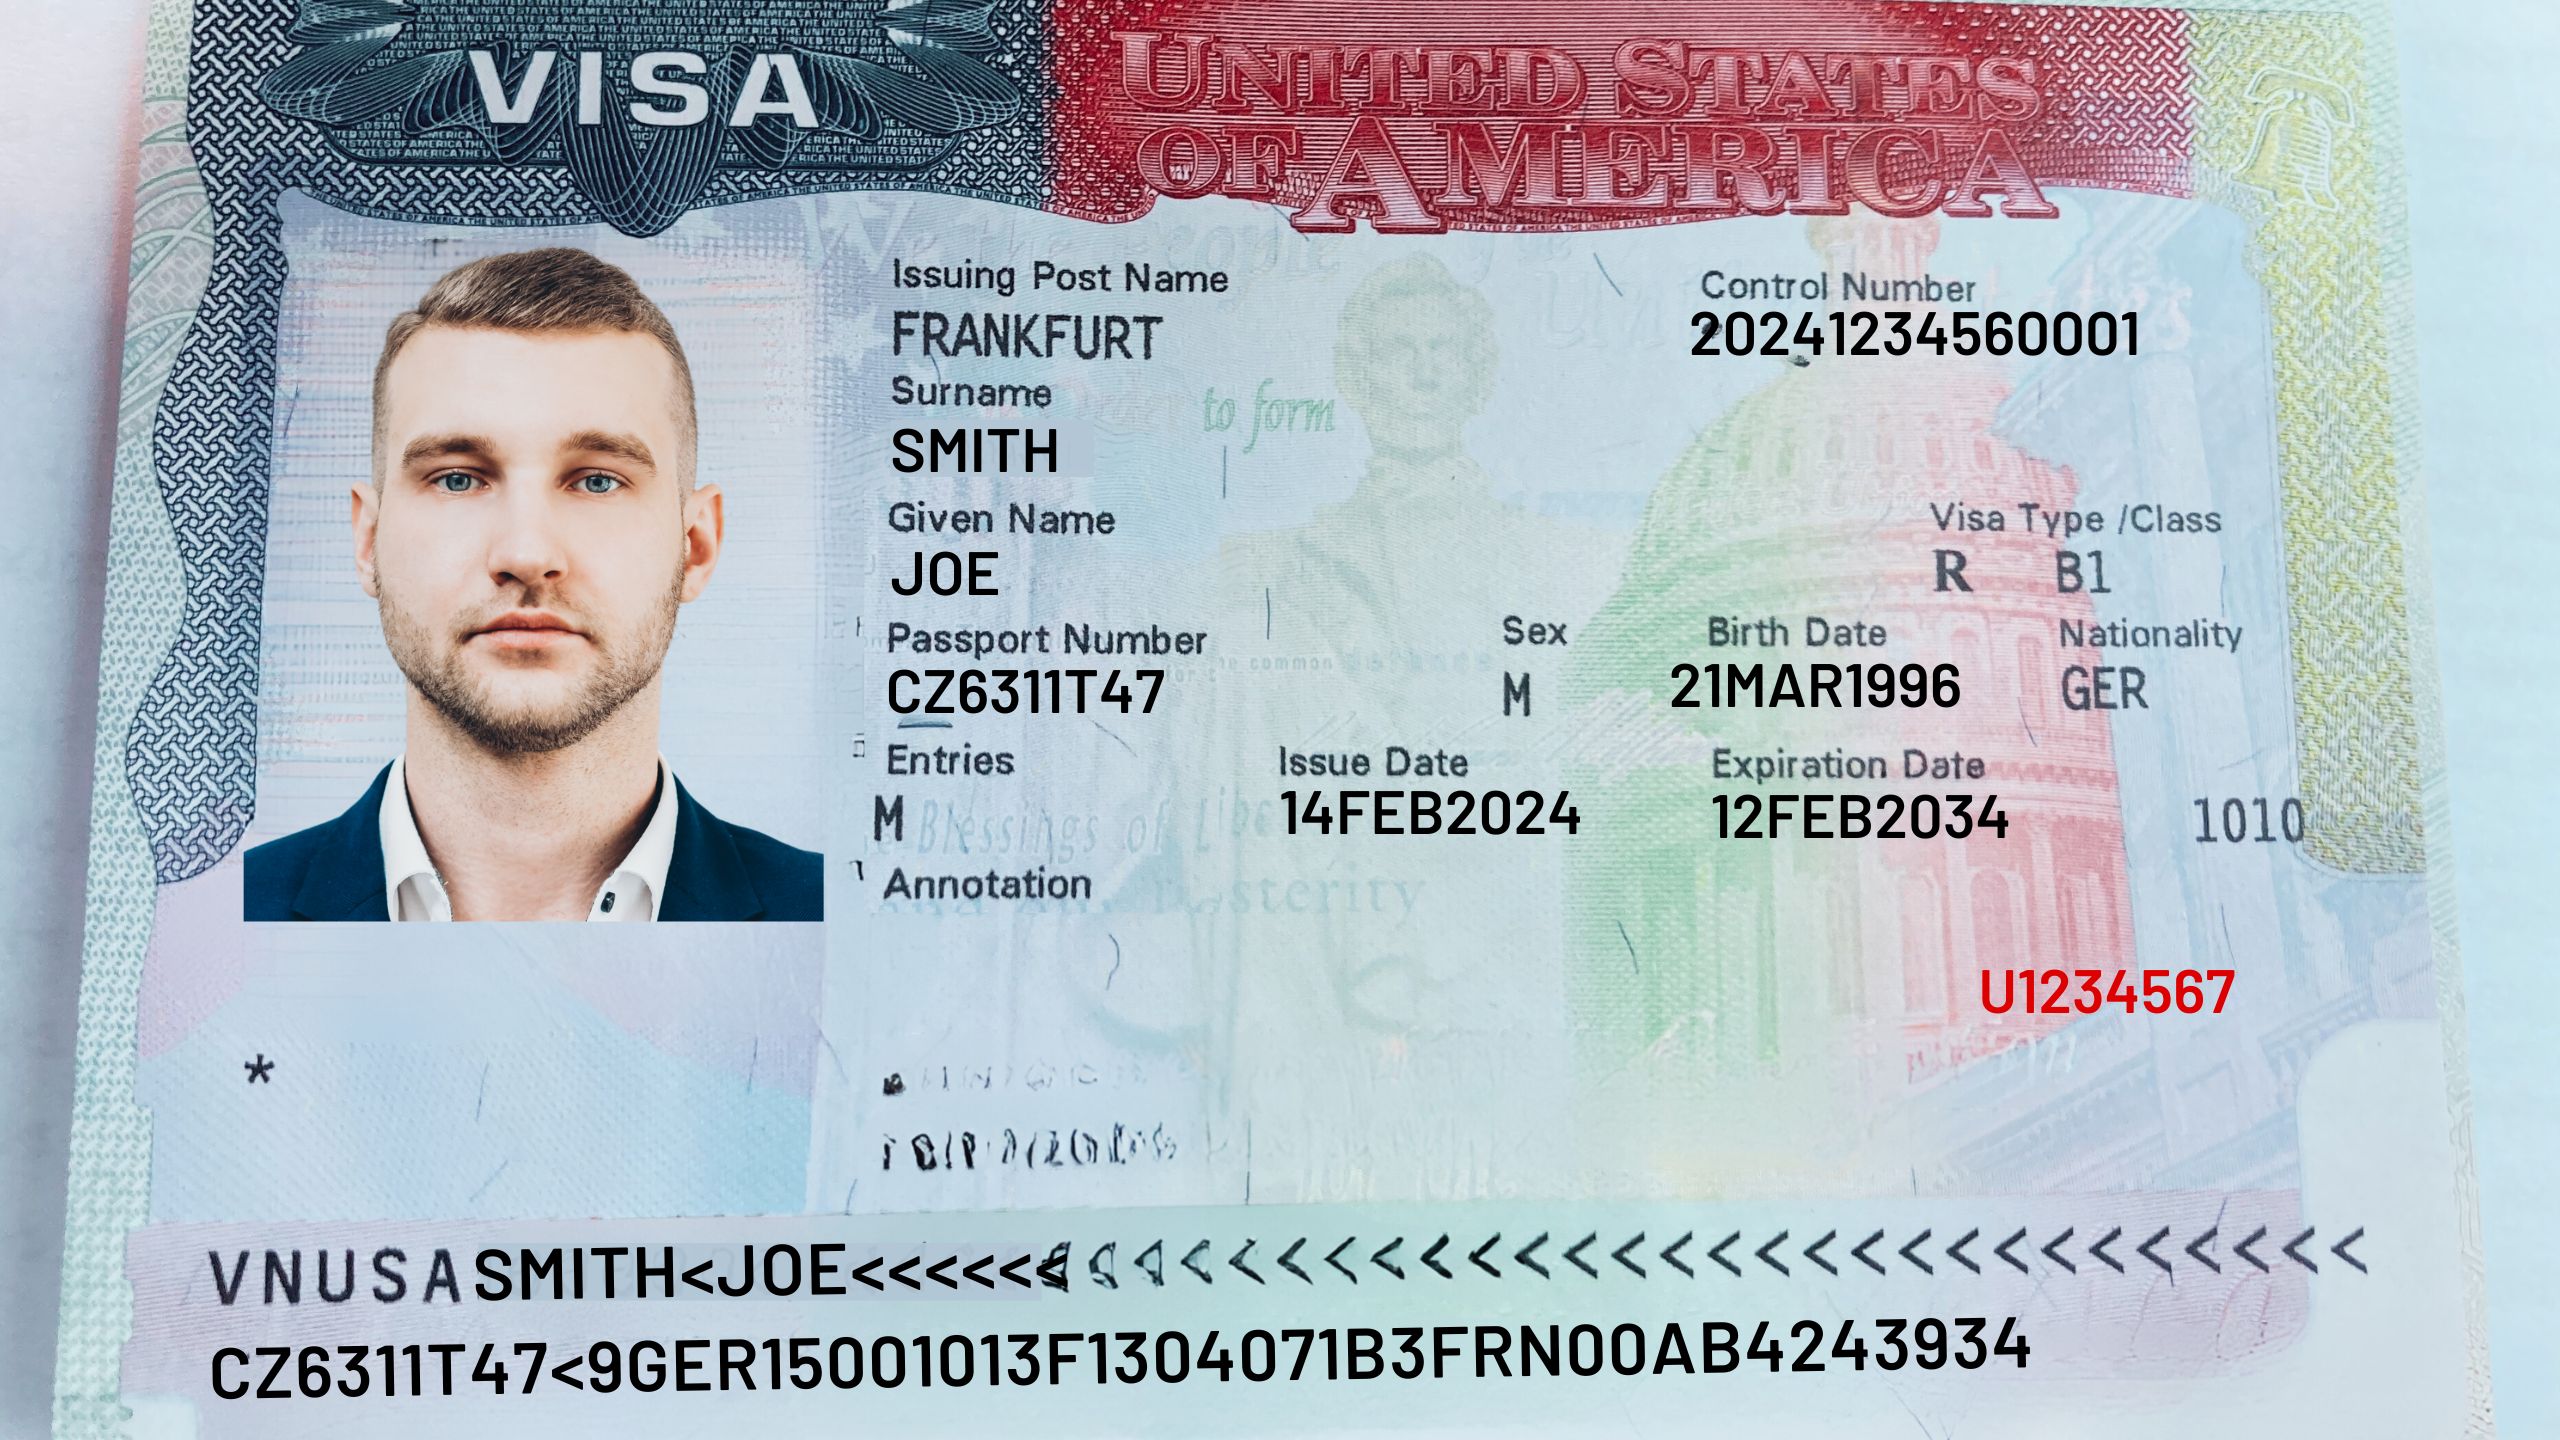
If your application is approved, follow the instructions for passport return or electronic visa delivery. When you receive the visa, check your name, passport number, category, validity dates, and any entry or stay conditions. Report errors through the official channel before you travel.
Keep in mind that a visa may permit you to seek entry without guaranteeing that you will be admitted. Border officials may ask about the purpose of your visit and check whether you meet the conditions. Carry the documents that the destination requires or that reasonably support your plans.
Source: greencardpetitions.com
Track the application
Use the official case status tool or instructions provided by the embassy or immigration office.
Reply to document requests
Provide the requested information in the required format and by the deadline.
Check the issued visa
Review personal details, permitted entries, dates, and conditions as soon as you receive it.
Follow the entry rules
Respect the authorized stay and any restrictions on work, study, or other activities.
What Does Administrative Processing Mean?
Administrative processing means that the authority needs to complete further checks or review before reaching a final outcome. It does not always mean that the application will be refused, but it can add time. Follow the instructions given to you and check the official case-status guidance instead of assuming that silence means approval.
Do not treat a pending application as an approved visa.
Follow the stated contact rules
Use the official contact method and any waiting period provided by the authority.
7. Common Visa Application Mistakes and How to Avoid Them
Many avoidable visa problems begin with a wrong category, missing documents, or information that does not match across forms. A careful review before submission can reduce errors, although no checklist can guarantee approval. Government officials make decisions under the rules that apply to each applicant and case.
Another common mistake is applying too late. People may focus on flight dates without allowing enough time for an appointment, document checks, or administrative processing. Check current appointment information early and leave room for delays. Do not assume that paying for faster travel or using an agent will speed up the government’s decision.
Applicants should also be careful about unofficial websites and fraudulent promises. A private business may offer help with forms, but it cannot guarantee that a government will approve a visa. Be cautious if someone promises approval, asks you to lie, requests payment through unusual channels, or claims to have special access to embassy officers.
If your visa is refused, read the written explanation and follow the official instructions. The reason matters. Some refusals involve missing documents, while others mean the applicant did not establish eligibility under the category. Reapplying without addressing the reason may lead to the same result and another fee.
Source: en.usvisaservice.de
Choosing the wrong visa
Review the permitted activities for each category before selecting one.
Submitting incomplete records
Use the current official checklist and verify that every required document is included.
Providing conflicting details
Check dates, addresses, job information, funding sources, and travel plans across all documents.
Using false documents
Never alter statements, invent employment, or submit a fake invitation. Misrepresentation can have serious consequences.
Trusting guaranteed-approval claims
Only the responsible government authority can decide the application.
Ignoring visa conditions
Do not work, study, or remain beyond the permitted period unless the rules allow it.
What Should You Do If Your Visa Is Refused?
Start by reading the refusal notice carefully. It may explain that documents are missing, further processing is needed, or you did not qualify for the visa category. The next step depends on the legal reason and the destination country’s procedures.
If the notice asks for more information, provide it as instructed and within the stated deadline. If the decision is final for that application, check whether reapplication is permitted and whether your circumstances or evidence have changed enough to address the problem. Some decisions have no appeal process, and some grounds of ineligibility require specialized legal advice.
Understand the stated reason
Do not assume every refusal has the same cause or remedy.
Correct the actual problem
Address missing evidence or changed circumstances rather than submitting the same case without changes.
Seek qualified advice when needed
For complex immigration issues, consider a licensed immigration lawyer or another authorized professional in the relevant jurisdiction.
Frequently Asked Questions
Q
How long does it take to get a visa?
The time varies by country, visa category, appointment availability, and individual circumstances. Some electronic authorizations are processed quickly, while other visas require interviews, document review, or background checks that can take weeks or longer. Check the destination government’s current processing guidance and apply well before your planned trip.
Q
How much does a visa cost?
There is no universal visa fee. The amount depends on the destination, visa category, nationality, and any additional services required. You may need to pay an application fee, a service charge, a biometric fee, or an issuance fee. Check the official fee schedule before paying, and remember that some application fees are not refundable after a refusal.
Q
Can I get a visa without an interview?
Sometimes. Certain countries and visa categories allow eligible applicants to apply online or qualify for an interview waiver. Other applications require an in-person interview or biometric appointment. Do not assume that an interview is optional just because another applicant did not need one. Follow the current rules for your destination and case.
Q
Can I apply for a visa while living in the United States?
In many cases, yes, but the process depends on your citizenship, lawful residence, destination, and visa type. Some countries accept applications from people who are legally present in the United States, while others may direct applicants to a consulate in their country of nationality or residence. Confirm where you are allowed to apply before paying a fee or booking an appointment.
Q
Does an approved visa guarantee that I can enter the country?
No, not in every country. A visa often lets you travel to a port of entry and request admission, but border officials may still check your eligibility and travel purpose. You must also follow the visa’s conditions and permitted stay. Carry relevant documents and answer questions truthfully when you arrive.
Q
Can I apply again after my visa is refused?
In many cases, you can apply again, but the right approach depends on the reason for refusal and the rules of the destination country. Review the refusal notice first. If you submit another application, make sure you address the actual issue, provide accurate evidence, and pay any required new fee. If the case involves fraud allegations, prior immigration violations, or a complex legal ground, seek qualified advice before reapplying.
✦ Wrapping Up
Conclusion
Getting a visa starts with one clear task: finding the correct entry rules for your passport and destination. Once you know the right visa category, check the official document list, complete the application carefully, pay the required fees, and arrange any interview or biometric appointment. Keep copies of your records and allow enough time for processing.
The most useful preparation is honest and specific. Your application should explain your real purpose of travel and include evidence that meets the rules for your category. Avoid false documents, guaranteed-approval promises, and last-minute assumptions about processing times. If a problem arises, use the official instructions and address the reason before taking another step.
💡 Key Takeaway
Before you book nonrefundable travel, visit the official government or embassy website for your destination, confirm whether you need a visa, check the correct category and current fees, and build a document checklist around your own circumstances.